Installing NetVizor
How to install NetVizor on your network.
NetVizor Manual
Find the feature and settings documentation below and click to navigate to that page.
- 1) Monitoring
- 2) Viewing Logs
- 3) Configuring Logging
- 4) General Settings
- 5) Advanced Settings
- 6) Scheduling
- 7) Content Filtering
- 8) Stealth Mode
- 9) Alert Notifications
- 10) Transferring Settings
- 11) Report Generation
- 12) IP Security
- 13) Security Auditing
- 14) Roving User Tracking
- 15) Log Searching
- 16) Log Location Config
- 17) The Web Interface
- 18) Email Log Delivery
- 19) Log Retention
Installation
NetVizor includes two separate installation programs that you can use:
- NetVizor Monitoring Client (NVClientInstall.exe): this program performs the actual recording and monitoring of the PC. This program must be installed on each PC you wish to monitor for monitoring and remote control.
- NetVizor Viewer Software (NVViewerInstall.exe): this program allows you to view all the PC's on your local network group. With this software you can easily point and click through different PC's to view all activities from a central location. This software can be installed on any PC you wish to monitor your network from.
By installing NetVizor you agree to the standard legal disclaimer and EULA specified HERE.
Preparing your Computer for the NetVizor Installation
Before installing NetVizor you may need to take some preparatory steps to get your computer ready for its installation.
First, if you have any antivirus or antispyware software installed you should disable it temporarily. Any auto-protect or real-time scanning features should be turned off at this time. When you are done installing NetVizor you will want to exclude NetVizor's files from your antivirus's scanning - see the "Configuring your Antivirus / Antispyware" section below.
Second, if you are on Windows Vista, Windows 7, Windows 8 or Windows 10 you will want to disable the UAC feature that Windows uses. The UAC feature can prevent keystroke logging from working properly, and/or saving settings changes within NetVizor properly. For visual how-to's on disabling UAC, please use the following link: Windows 7/8/10 UAC Disable
Third, ensure you are installing under an account with Administrator access. In Windows Vista or Windows 7 / 8 / 10 you can right click on the NetVizor installation file you downloaded and choose the "Run as Administrator" command to ensure this if you are not sure if your user account is an administrator or not.
Fourth, it may be beneficial to review NetVizor's installation guides located at www.netvizor.net/installation-guide.htm/
You can now proceed to installing NetVizor.
Installing the NetVizor Monitoring Client
NetVizor's monitoring client can be installed on a PC in seconds. The installation is self configured so you only need to double click the NVClientInstall.exe file. The installation takes a few seconds - nothing will appear to happen as the client installs in stealth. The default HOTKEY to access the software is CONTROL + ALT + SHIFT + M and the default password is 'spytech' (no quotes). Once you access the software you can change the password, specify access privileges, change logging settings, etc. When the client is installed it will automatically start monitoring and will be available for remote access.
32-bit Windows Installation Path: x:\program files\nvclient\sysdiag.exe
64-bit Windows Installation Path: x:\program files (x86)\nvclient\sysdiag.exe
Installing the NetVizor Viewer
NetVizor's viewer is easily installed by running the NVViewerInstall.exe. Simply install the viewer and run it (NetVizorViewer.exe) and you will be presented with a list of PC's in your local workgroup on your network.
Installing the NetVizor Client across your Network
Since NetVizor is tailored for network usage it is very easy to deploy it across your LAN. The three methods below will show you how NetVizor can be deployed across your network.
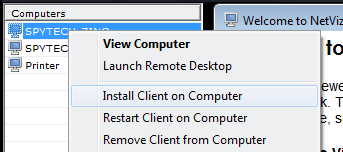
METHOD ONE - Remote Network Installation
NetVizor can be quickly installed remotely across your network with the NetVizor Viewer without having to visit each computer. Please see our visual install guide here for a detailed walkthrough.
For troubleshooting for the remote network install method please see NetVizor's FAQ here.
METHOD TWO - Batch File Installation
1. Create a .bat file with the line "\\server-name\netvizor-folder\NVClientInstall.exe" (no quotes), where server-name is the name of the server on your network, and netvizor-folder is the name of the shared folder storing the NVClientInstall.exe.
2. If you wish to have previously created NetVizor filter/program settings applied with your batch file copy the nvopts.dat, nvfa.dat, and nvfw.dat files from your Windows folder into the \\server-name\netvizor-folder\ directory. Then add the following line to your batch file (replace %windir% with the name of the Windows directory on the target computer (ie: WINNT or Windows)
- For Windows XP/200x:
XCOPY /S /Y \\server-name\netvizor-folder\*.dat %ALLUSERSPROFILE%\Application Data\*.dat
- For Windows Vista/7/8/10:
XCOPY /S /Y \\server-name\netvizor-folder\*.dat %ALLUSERSPROFILE%\sa\*.dat
3. Run the batch file on every computer you want to install NetVizor on - the client will self-install in stealth, as described above.
Sample Batch File (copy and paste into notepad and save as a .bat file to use):
REM making connection to shared NetVizor folder...
NET USE \\server-name\netvizor-folder\
REM running the main NetVizor installer
\\server-name\netvizor-folder\NVClientInstall.exe
REM copying over the previously made NetVizor settings and filters
XCOPY /S /Y \\server-name\netvizor-folder\*.dat %ALLUSERSPROFILE%\sa\*.dat
REM deleting the network connection...
NET USE /DELETE \\server-name\netvizor-folder\
METHOD THREE - Logon Folder Installation
1. Place the NVClientInstall.exe file in your domain controller logon folder on your network
2. Add the following commands to your logon script that is contained in your domain controller folder (replace $logondir$ with your domain logon folder)
Windows XP/200x:
if exist "%ALLUSERSPROFILE%\Application Data\nvopts.dat" goto :NOINSTALL
copy "$logondir$\NVClientInstall.exe" "%ALLUSERSPROFILE%\Application Data\NVClientInstall.exe"
%ALLUSERSPROFILE%\Application Data\NVClientInstall.exe:NOINSTALL
Windows Vista / 7 / 8 / 10:
3. Users will automatically install NetVizor when they logon.if exist "%ALLUSERSPROFILE%\sa\nvopts.dat" goto :NOINSTALL
copy "$logondir$\NVClientInstall.exe" "%ALLUSERSPROFILE%\sa\NVClientInstall.exe"
%ALLUSERSPROFILE%\sa\NVClientInstall.exe:NOINSTALL
ADVANCED INSTALLATION GUIDELINES
With NetVizor's centralized monitoring capabilities you may find the need to customize the installation on each PC that you intend to monitor. For instance, if you want to have each PC use a website filter database you have compiled you will want to configure each client to use this list - without having to manually export it to each client (very time consuming). Here is a way to circumvent this tedious footwork.
1. Install the NetVizor client on a PC you want to monitor. Configure it as needed (including logging settings, website filters, and application filters).
2. From the 'General Options' menu click on "Export NetVizor Settings" - specify a file to save the settings to. For instance: settings.exp
3. From the "Content Filtering and Behavior Alerts" menu click on "Export Website Filters" and "Export Application Filters" - specify a file for each of these settings exports as well. For instance: websites.exp and applications.exp
4. Place these .exp files in your logon folder (like we've described in method two above).
5. Add the following commands to your logon script that is contained in your domain controller folder (replace $logondir$ with your domain logon folder) These lines should be added AFTER the "shell" command indicated above in method two. These settings will copy over your exported files and set them as the current configurations for the remote PC to use.
For Windows XP/200x:
- copy "$logondir$\settings.exp" "%ALLUSERSPROFILE%\Application Data\nvopts.dat"
- copy "$logondir$\websites.exp" "%ALLUSERSPROFILE%\Application Data\nvfa.dat"
- copy "$logondir$\applications.exp" "%ALLUSERSPROFILE%\Application Data\nvfw.dat
For Windows Vista / 7 / 8 / 10:
- copy "$logondir$\settings.exp" "%ALLUSERSPROFILE%\sa\nvopts.dat"
- copy "$logondir$\websites.exp" "%ALLUSERSPROFILE%\sa\nvfa.dat"
- copy "$logondir$\applications.exp" "%ALLUSERSPROFILE%\sa\nvfw.dat
Settings can be pushed to machines later on, as well, via the Viewer's Synchronization feature.
Configuring your Antivirus/Antispyware
Before re-enabling your antivirus or antispyware you will want to configure it to ignore NetVizor's files now that it is installed. For instructions, as well as a complete list of NetVizor's files, please visit our Antivirus Exclusions page on our website. Once the exclusions are made you can re-enable your antivirus.